Join Twice, Unroll Once
I started with a simple vase shape, just to get some familiarity with the material and process. I'm glad I did because I learned that I need to be more precise with my scoring and also what a factor the "curvature" of the shape has on the alignment.
With that in mind I started brainstorming idea for my final paper craft.
Creativity Booster
I decided I'd build myself that would be quite useful for the rest of my career at AUArts, a creativity booster! Inspired by one of the props on The Flash that makes you smarter.
This was my first prototype of the highly refined process of crushing paper to my head.
I was planning on using it to base my design off of but then I decided I'd rather a learn a new skill, 3D scanning! My old unused XBOX One Kinect has been sitting unused in one of my drawers and I discovered that it can be used as a simple 3D scanning camera.
Cleaned up in Meshmixer
Imported into Rhino (Quite clear here some of the issues in the scan)
I started drawing triangles but I decided on a different technique instead
Use a low poly sphere mesh, 12 x 12, and then delete unneeded faces.
Then I triangulated the mesh because I wanted a bit more of that faceted look and for the following tweaks I need to ensure the faces stay planar. I turned on points so that I could shift parts of the mesh to better fit my head.
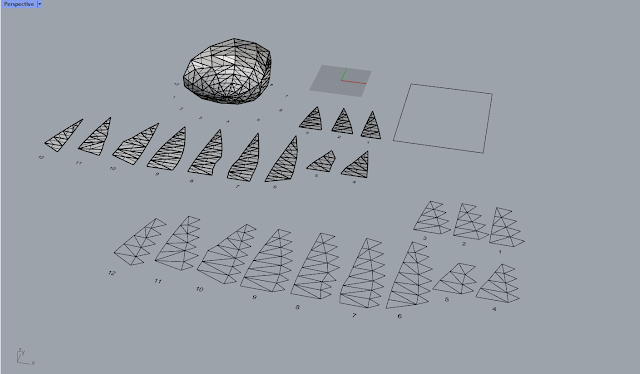
I then used MeshToNURB to create surfaces, and from there I was able to do my explode, join, unroll process. FORESHADOWING, it did not go perfectly.
Let the cutting and folding begin!
I found the stylus from my braille slate was perfect for scoring as it is designed to be very precise but it's not sharp.
Sticky glue hands don't do well at progress photos but it went well up until I got to panel 5. Mind meltingly confused. Why was it not fitting? I knew there would be some panels that didn't need tabs but I was just going to cut them off. This was severely misaligned ...
Look carefully at this polysurface and where it starts and ends ...
Look carefully at this polysurface and where it starts and ends ...
😠
Something I anticipated, was that the helmet was the wrong way around. Bryan had mentioned something like this in class but looked at the model, how it would be printed and folded and convinced myself that it wasn't going to be a problem. Well, I was wrong but it's an easy fix for the next stage.
The faceted low poly style in physical form is highly satisfying, especially when it's done with something physically planar like paper.
For the final version I will add LEDs to light up the helmet. I'll make two layers of the helmet and embed the LEDs and wiring in between the two. Stretch goal is to add a micro controller or something so the lights and change.
For the final version I will add LEDs to light up the helmet. I'll make two layers of the helmet and embed the LEDs and wiring in between the two. Stretch goal is to add a micro controller or something so the lights and change.


.jpg)


Comments
Post a Comment